How to Measure Tube Diameter for Light Mounts (Get the Right Clamp)
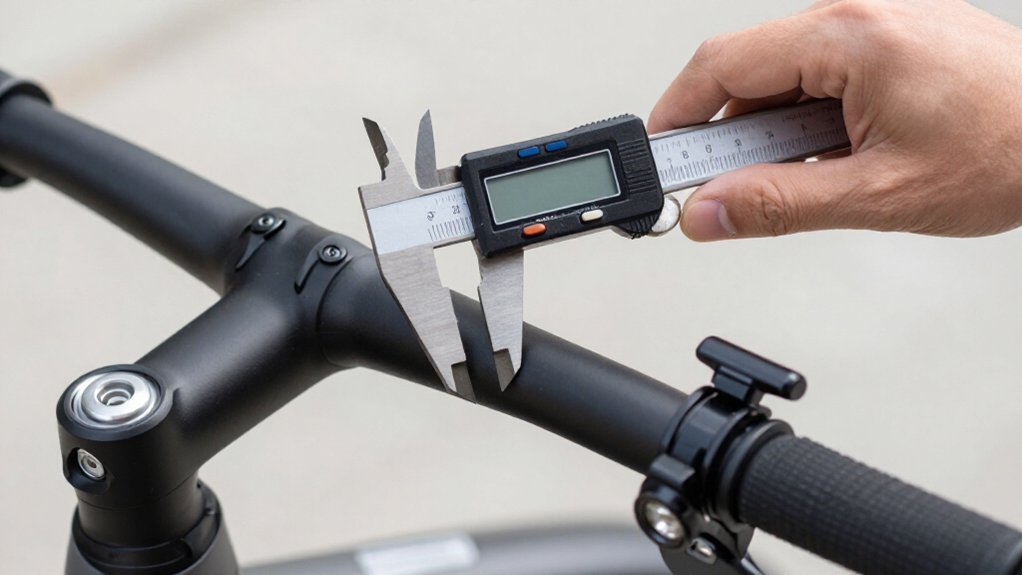
Measure the tube’s outside diameter (OD) where the light clamp will sit; don’t rely on nominal tubing size.
Use calipers with the jaws perpendicular to the tube, applying pressure without crushing it. Take two or three readings on a straight section away from bends, then average them.
Include paint or coating in the measurement.
If you lack calipers, measure circumference and divide by 3.14159.
Check clearance, then choose a clamp that fits; the steps ahead help you confirm your choice.
Measure Tube Diameter Accurately
To choose the right Adel clamp, measure the tube’s outside diameter (OD) exactly where the clamp will sit—not the nominal size printed on the tubing.
Use vernier/digital calipers. Place the jaws perpendicular to the tube axis, and apply enough pressure to contact the surface; don’t crush the tube or its cushion. Measure a straight section, clear of weld beads, bends, and spots that may have been clamped or collapsed.
Take two or three readings around the circumference and average them to account for variations.
Without calipers, wrap a flexible tape around the tube and record its circumference (C). Divide C by 3.14159 to calculate OD. If your clamp chart uses dash numbers, measure in 1/16-inch increments so the OD matches the clamp’s effective range with clearance.
Measure Mounting-Bar Clearance
Measure the mounting-bar clearance with the tube fully seated, checking the straight run and every bend for the smallest gap to nearby harnesses, panel flanges, or bracket edges. Use a caliper or depth gauge to measure that minimum gap, and record it before choosing a clamp; routed wires or hoses may reduce the space beyond your drawing’s dimensions.
- Add the clamp’s outer thickness, including any cushion or wedge, to your clearance check.
- Dry-fit the clamp and tube; verify space remains at the tightest curved *passage* and next straight run.
- Reject a size that contacts nearby parts or leaves no safe clearance.
- Recheck after routing each cable or line, since it can change the available gap.
Choose only after confirming the assembly fits without interference.
Step 1: Clean the Mounting Tube
Before sizing an Adel clamp, wipe the mounting tube clean and dry so oil, oxidation, or loose buildup won’t skew your measurement.
Measure only on a straight, uniform section of tubing; avoid bends, welds, and swaged areas, which don’t represent the tube’s true diameter. Check the exact spot where the clamp will sit for burrs, rough patches, or raised paint ridges. Lightly deburr or sand those high points so the clamp meets the tube consistently.
If the tube is painted, measure its outside diameter at the clamping location with the paint in place; that thickness forms part of the real surface.
Take two or three readings around the circumference, then average them. This helps account for slight out-of-roundness or localized buildup that may make one reading misleading. Keep the tube supported and your measuring tool square; don’t scrape away sound coating or damage wiring.
Step 2: Select a Compatible Clamp Style
Once you’ve measured the tube, choose a clamp style for its location and what it will support: use DG for a cushioned loop, WDG for wiring that needs added protection from pinching, or an HT variant near exhaust heat.
Next, match the clamp’s effective inside-diameter range to your measured tube diameter, not a nominal tube label. The dash number gives inside diameter in sixteenths of an inch: -12 is about 12/16 inch, or 3/4 inch, while -14 is about 14/16 inch, or 7/8 inch.
For a small, straight 3/4-inch tube, MS21919WDG-12 may fit; for a larger curved section near 7/8 inch, consider MS21919WDG-14. If the clamp will hold conductors, choose WDG’s wedge cushion to reduce pressure that could pinch or damage wires.
Step 3: Mark the Tube’s Contact Points
To size the clamp accurately, mark the two points where its cushion will contact the tube on a straight, accessible section.
Use a flexible tape or calipers to identify the tube’s actual outer diameter at that location, then place a small, clear mark on each side of the intended contact area. Measure across the tube at those touch points, not along a nearby bend, weld, or change in direction; those areas may have a different diameter and can lead you to choose the wrong clamp.
If a nominal three-quarter-inch tube runs slightly larger, mark the largest outer-diameter section the clamp is expected to grip. For a curved run, identify the curve where the clamp will rest, such as a slightly larger seven-eighths-inch portion, rather than measuring at its straight inlet or outlet. Repeat the same marking method at every mount so your measurements stay consistent across all mounts.
Step 4: Seat Clamp Around Tube
At the marked location, seat the Adel clamp around the tube and check its fit against the tube’s actual outer diameter (OD), not its nominal catalog size. If you have calipers, close the jaws gently on the tube without squeezing it. Take two or three readings around the circumference and average them.
For a dash-numbered clamp, such as MS21919 DG/WDG-xx, use that measured OD to select a clamp whose effective range includes the tube. The dash size refers to an internal dimension, not the tube’s nameplate ID. Position the clamp at the marked contact points and check that the tube sits near the middle of the usable range, with about 1/8 inch (0.12 inch) of clearance. Don’t force a clamp that won’t center or appears too tight; choose the correct range before assembly.
Step 5: Test Clamp Stability
With the clamp seated, gently twist it 10–20° to check for slipping. It should stay in place rather than rotate freely. Before judging the fit, confirm the clamp’s inside diameter captures the tube’s actual outside diameter (OD). An Adel clamp’s dash number represents its inside diameter in 1/16-inch increments; don’t rely on the tube’s nominal size.
If the clamp bottoms out against the tube before its cushion can compress, stop. Loosen it and choose the next larger dash size. A clamp that feels stuck may still be unstable.
Tighten the clamp to your installation specification, then apply light side-to-side force to the tube at the clamp. You should see virtually no rotation. After five to ten minutes of handling or vibration, check again. If the clamp has migrated or twists, the tube may fall outside its effective size range. Reassess the fit before installing or using the light.
Step 6: Torque Clamp Bolts Evenly
Tighten the clamp bolts gradually, alternating between sides or contact points so the clamp compresses evenly instead of cocking against the tube. Work in small increments, such as quarter turns, and switch sides or contact points after each pass. For a multi-bolt clamp, follow a star or cross pattern to build symmetrical pressure and reduce tube distortion or a lopsided grip.
If the manufacturer gives a torque specification, use a calibrated torque wrench and reach the rated value over several passes; don’t tighten one bolt fully in a single step. Follow mount instructions. Then inspect the clamp halves for a flush fit with no visible gap and no tube shift. Recheck tightness after initial settling and after repositioning to guard against vibration-related loosening.
Verify Beam Alignment at Night
Once the clamp is secure, check the beam alignment at night on level ground. Mark your beam centerline on a wall at a distance of 25 ft (7.6 m) before dimming lights. Turn the system on and confirm the spot lands on your mark. Watch for left-right or up-down drift as the vehicle idles and the suspension settles.
If the hotspot misses, adjust one fastener at a time, then check again; a angle change can shift it several inches. Use a bubble level or phone inclinometer to compare the mounting surface angle with your baseline. An unintended tilt can skew the beam despite a mount that looks straight.
After vibration or transport, repeat the wall-center test. Keep the hotspot within your tolerance—about ±1–2 in (±25–50 mm) at 25 ft.
Slipping on Powder-Coated Bars
If a clamp slips on a powder-coated bar, measure the tube’s actual outside diameter with calipers after coating; the added thickness can change the fit from the bare-metal size. Then compare that coated OD—not the nominal tube size—with the clamp’s usable range. Aim for the middle, leaving clearance at both limits.
| Check | Action |
|---|---|
| OD | Measure after coating |
| Range | Center coated OD |
| Grip | Choose wedge cushion |
Powder coating can lower friction, so a WDG/WG-style wedge cushion can resist rotation and sliding better than a non-wedged design. After tightening, mark the position and test it during normal handling. If it moves, choose a better-fitting clamp or abrasion-resistant cushioning, especially where vibration could gradually shift the mount. Keep the light secure.
Inspect Fasteners for Corrosion
Before fitting or reusing a clamp, inspect every screw, bolt, and other fastener for rust pits, flaking corrosion, or damaged threads, especially around the head where moisture can collect. If corrosion reaches a thread, clean to bright metal, then chase it with the correct tap or die. Replace badly pitted fasteners or any that won’t tighten securely; consider corrosion-resistant hardware.
At dissimilar-metal joints, check for white powder, crevice stains, or rapid surface loss, signs of galvanic corrosion. Remove scale from gripping surfaces; oxidation can prevent full clamping torque and let vibration loosen the mount. Apply an approved anti-corrosion treatment at the interface per maintenance guidance, then retorque. Don’t reuse hardware that won’t hold securely. Recheck after installation for movement before using the light mount.
Conclusion
Measure the tube’s outside diameter and check mounting clearance before you choose a clamp. Clean the bar, mark the contact points, and tighten bolts evenly to the clamp maker’s torque specification. After installation, verify beam alignment at night and retighten only as directed.
If a clamp slips on a powder-coated bar, stop and correct the fit rather than overtightening. Inspect fasteners regularly for corrosion or looseness. A secure, compatible mount helps keep your light steady and reduces the risk of damage or road hazards.