Why Does My LED Light Bar Flicker? Causes and Quick Fixes
Your LED light bar usually flickers because of unstable voltage, loose grounds or connectors, an overloaded circuit, or an overheating driver.
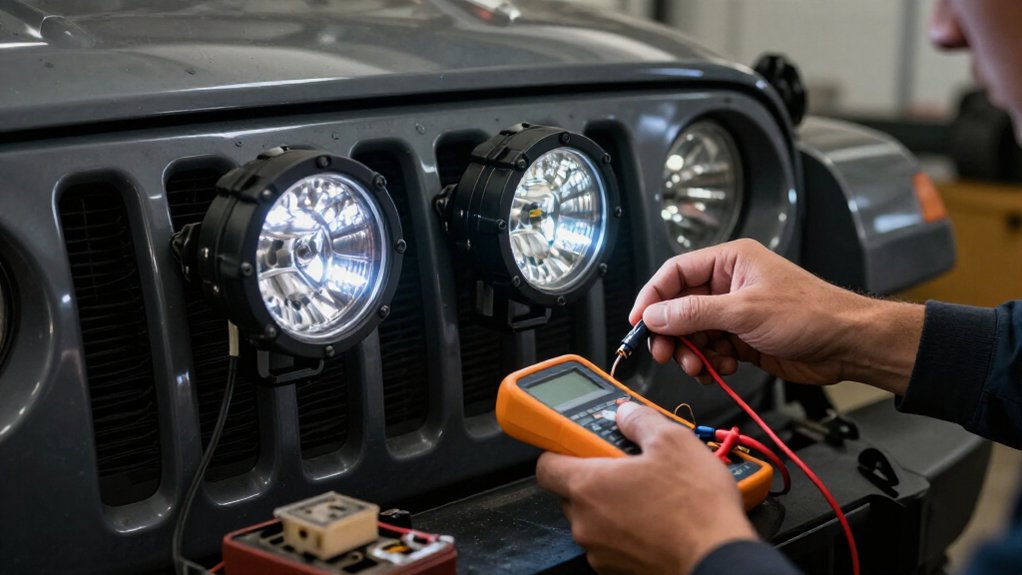
Check the ground, fuse, wiring, and relay first, then measure voltage at the bar under load; a 12V system should stay near 13.8 to 14.4V.
If flickering starts during cranking, inspect battery and charging connections; if it begins after warm-up, improve airflow and check for thermal protection.
The steps below can help you isolate the fault.
Check Ground and Voltage
Start by checking the light bar’s ground and return path for loose or corroded connections, which can raise resistance and make current pulse. Then test supply voltage at the bar while the engine runs. A 12V system should hold 13.8 to 14.4V under load; a 24V system should read 27.6 to 28.8V.
Correct any voltage drop before replacing components. Watch the bar during startup and at idle: flicker that changes with engine speed can point to a dip or alternator irregularity destabilizing the LED driver. Check that battery, relay-output, and splice wiring is adequately sized and tight; undersized cable or loose terminals can interrupt supply.
If voltage remains stable, power the bar from a known-good source and ground. If it still flickers, suspect driver sensitivity or a fault.
Inspect Connector Pins
Turn off the system, then check that the light bar’s power and ground connector pins are fully seated and don’t wiggle. Loose terminals increase resistance, so they can interrupt current and produce flicker. Examine each contact for corrosion, oxidation, or brown and black heat marks; degraded surfaces may cause strobe-like flashes.
Check that no pin is bent or pushed back into the plug. Misaligned contacts can separate intermittently, particularly when vibration moves the harness. If you have a multimeter, measure voltage drop across the connector while the light bar is operating under load. A noticeably high reading points to poor pin-to-pin contact.
Turn the system off before reseating the connector. Clean dirty pins, then reconnect the plug firmly. Replace the plug or harness if a pin is damaged. Restore power and check whether the flicker stops. This quick inspection often identifies the faulty connection early.
Flickering During Engine Startup
If the light bar flickers as the engine starts, cranking may be pulling the 12V or 24V supply outside the LED driver’s stable range. Cranking often causes the sharpest voltage disturbance; voltage can dip or spike as the alternator shifts from battery power to charging.
An unstable supply makes the driver reduce or interrupt current, producing a strobe-like flash. Startup loads from a winch, fans, or other lights can worsen the transient. Measure alternator output with the engine running: expect about 13.8–14.4V on a 12V system or 27.6–28.8V on a 24V system. Also check that battery terminals and grounds are tight, since poor connections increase startup sag.
If readings and connections check out, the driver may be failing or poorly rated for repeated transients. Replace it with a quality, surge-tolerant 12/24V driver or bar. This test separates vehicle-side voltage problems from a bar-side driver fault during repeated starts.
Single-Row vs. Double-Row Bars
Your bar’s row configuration affects how flicker responds to driver or wiring faults. Double-row bars usually draw more current, so voltage sag, weak relays, undersized wiring, or poor grounds can trigger flicker sooner.
Note whether flicker occurs at startup, under load, only at certain brightness levels, or on just one bar to narrow the cause.
Row Configuration Differences
Row configuration can help pinpoint why an LED light bar flickers. A single-row bar has a simpler internal layout, so inspect its string connection and driver channel first. A poor connection there can interrupt the whole row.
Double-row bars use multiple parallel strings and may have a separate driver for each row. If one row shimmers while the other stays steady, check that row’s connector and driver output. If flicker changes with focus, dip, or switch settings, note which row responds; that pattern can isolate the failing circuit.
Check positive and ground connections, relay contacts, and harness first. Wiring resistance can cause voltage sag and flicker, especially in a double-row bar with an unstable driver. Measure voltage at the bar during flicker, then at the battery. If supply remains stable, test each row’s connector and driver separately. A bar reading points to wiring or switching losses; a row-specific symptom points toward that row’s circuit. Record results before replacing the bar.
Power Draw Comparison
Power draw can explain why a double-row LED light bar flickers more readily than a comparable single-row model. If both bars share a brand and series, compare nameplate wattage: a small single-row unit may use 30–60 watts, while its double-row counterpart may use 60–120 watts.
A double-row model typically has roughly twice the current because it carries more LEDs and higher total wattage. On a 12-volt system, estimate amps by dividing watts by volts. The extra current can expose voltage drop from thin cable or loose, oxidized terminals and destabilize a marginal driver.
Check that your battery or alternator, fuse, relay, switch, wiring, and ground can handle the load. If voltage sags under startup or other heavy loads, upgrade cable gauge and connections.
Flicker Pattern Clues
Beyond comparing wattage and wiring capacity, note which part of the bar flickers. A single-row flicker usually points to a local fault: a failing driver channel, loose in-row connector, or intermittent feed contact. If the other row stays steady, inspect that row’s connector and ground, then check internal harness routing.
When both rows shimmer, start, or stop together, suspect a shared input or control point, such as the main driver, ground, or vehicle’s 12V/24V supply. Engine-start or throttle-related flicker, especially at idle, points to unstable vehicle supply voltage.
If one row flickers while the other remains stable, clean and tighten its terminals, and look for oxidation or damaged wiring. Alternating behavior can also signal a cracked board solder joint, damaged LED cluster, or driver output.
Check the Inline Fuse
Locate the inline fuse in your light bar’s power lead, then remove it and check for discoloration or a hot spot. Confirm its amperage matches the light bar’s specified draw, and reseat it firmly after checking the holder terminals for corrosion or looseness.
Replace a blown fuse only with the correct rating; if it blows again, check for a wiring short, reversed polarity, or a failing driver rather than upsizing it.
Locate the Inline Fuse
Start by finding the inline fuse in the light bar’s positive (+) wire, usually near the battery, relay, or power lead. Trace the positive lead toward its source; the holder is often tucked beside the battery, relay, or harness. Don’t confuse it with a connector. Switch off power before opening it.
Once located, ensure the holder and terminals are seated firmly in the wiring. A loose connection can interrupt current and make LEDs flicker, especially over bumps. To replicate an intermittent fault, power the bar and gently move wiring beside the holder, keeping hands clear of hot or moving parts.
If movement triggers flicker, focus on this link before tracing farther along the power path. Follow the lead carefully; don’t tug hard on the holder.
Inspect Fuse Condition
Inspect the inline fuse for a broken filament, heat discoloration, corrosion, or a loose fit in its holder; any of these can interrupt power and cause flickering. With the bar switched off, inspect the fuse body and terminals closely. Look for a separated filament, darkened or melted casing, corrosion, or terminals that don’t grip firmly in the holder.
A damaged or dirty contact can make the supply intermittent even when the fuse hasn’t fully failed.
If you have a multimeter, set it to continuity and probe both fuse ends. An open circuit means the fuse has failed, even if its casing looks intact. A continuous reading confirms a closed path. Check that the holder’s contacts grip the fuse terminals securely; corrosion or looseness can still cause intermittent power.
Replace a Blown Fuse
A partially failing inline fuse can interrupt power and make the LED light bar flicker. Check the fuse on the power lead before troubleshooting other components. Turn power off, remove the fuse, and inspect its element for a break or discoloration. Replace a damaged fuse only with one matching the manufacturer’s specified amperage; a higher-rated fuse won’t fix the fault and can leave wiring unprotected.
If the replacement blows immediately, stop. Repeated failures point to a short or damaged wire or connector in the light bar circuit. Don’t keep installing fuses. Use a multimeter to check that the holder’s terminals grip firmly and provide a low-resistance connection; loose or corroded contacts can interrupt current. If the fuse and wiring check out but flickering continues, measure voltage at the fuse or light-bar input while operating.
Beam Pattern Selection
Choose the right beam pattern when diagnosing flicker: a narrow spot beam concentrates light into fewer areas, making LED-driver intensity changes more noticeable on distant walls, road signs, and reflective surfaces, while a wide flood beam spreads the output and can make the same ripple look like an overall shimmer.
Test each pattern at the same 5–10 m distance and aim angle; otherwise, beam concentration may mimic electrical flicker.
| Pattern | Diagnostic appearance |
|---|---|
| Spot | Micro-flicker stands out at distance |
| Flood | Ripple appears as broad shimmer |
| Combo | Uneven zones suggest module or driver mismatch |
| Check | Compare same distance and aim angle |
If only brighter module zones flicker, inspect driver or CAN-load behavior; compare zones before replacing parts. Optics change visibility, not the underlying electrical fault during your test.
Thermal Overload Protection
Heat can make an LED light bar’s protection circuit rapidly dim or shut off the output, which may look like flickering. When the driver or LED junction overheats, thermal protection cuts output, then restores it as temperatures fall. Poor airflow, an enclosed mount, a dirty lens, or high ambient temperatures can create this on-off cycle.
Check whether flicker starts after the bar warms up and improves when it cools. Give the housing clearance, improve airflow, and clean the lens and contacts.
In a vehicle, verify voltage under load; instability can raise driver current and heat. A mismatched, undersized, or failing driver may also overheat early if flicker worsens over time. Inspect wiring and grounds for heat damage before replacing the driver or light bar.
Avoiding Incorrect Bar Ratings
The wrong electrical rating can make an LED light bar flicker even when its wiring looks sound. Compare the bar’s label and driver specifications with your vehicle’s actual supply, not just its nominal voltage.
- A 12V system reaches 13.8 to 14.4V while running; a 24V system reaches 27.6 to 28.8V. Choose a bar rated for that range.
- Check watts and amps against harness, relay, and fuse ratings; an undersized setup can drop voltage and cause strobing.
- Confirm the bar accepts your control mode: a DC constant-supply model may flicker with PWM-only control or an incompatible regulator.
- For a 9 to 32V bar, verify engine-start and alternator transients stay within spec.
Don’t assume a replacement will work: mismatched driver output or current can interrupt regulation, causing flicker despite seemingly correct voltage.
Test the Relay Switch
If the light bar flickers despite sound wiring, test whether the relay is interrupting power.
With the vehicle running, measure voltage at the relay’s output while you toggle the switch. It should stay near 13.8–14.4V on a 12V system or 27.6–28.8V on a 24V system. A drop points to unstable contacts or supply.
Next, check coil voltage at the trigger terminals with the switch on. Low or fluctuating voltage can make the contacts chatter. To isolate the relay, install a known-good automotive unit with the same coil type and current rating. If flicker occurs only when it energizes, inspect pins and crimps for heat damage, looseness, or corrosion; added resistance can interrupt power under load before replacing the relay or blaming the bar itself.
Conclusion
To stop your LED light bar flickering, check ground and voltage first, then inspect connector pins, the inline fuse, and relay switch. Note whether flicker occurs only during engine startup, and verify the bar’s rating matches your vehicle’s electrical system.
If thermal overload protection activates, reduce heat buildup and check airflow. Choose a beam pattern suited to your needs; single- and double-row designs don’t determine electrical stability. Retest after each change to pinpoint the fault before replacing parts.